
Batch transmitting guide
September 2022
On this page
- Before You Start
- 1. Introduction
- 1.1. Overview
- 1.2. Message security
- 1.3. Compatibility
- 2. Installation of the batch transmission software
- 2.1. Initial installation
- 2.2. Subsequent installations
- 3. Operation
- 4. Configuration
- 4.1. Channels
- 4.2. Proxy
- 4.3. Service mode
- 4.4. Viewing station
- 4.5. How to submit messages
- 4.6. Message status
- 5. Understanding sending and receiving of files
- 6. Message Tracking
- 6.1. Filters
- 7. How to contact FINTRAC
- 8. Glossary
Before you start
Batch reporting is the submission of multiple reports in one file. To use this, you have to create the batch file, and format the information according to specifications from the Financial Transactions and Reports Analysis Centre of Canada (FINTRAC). FINTRAC will provide you with batch transmission software to encrypt and transmit the batch file. That software is called CloudMask and this guide is about how to use it to transmit reports to FINTRAC.
Before you can download the batch transmission software, you have to be enrolled with FINTRAC for electronic reporting. You also need to have obtained a public key infrastructure (PKI) certificate.
For information about the batch file format or about how to obtain a PKI certificate, see the Batch documentation section on the Batch reporting page.
1. Introduction
1.1. Overview
The batch transmission software allows the secure and reliable exchange of data between you and FINTRAC.
You will send data in the form of messages. The messages will be secure due to the use of PKI encryption, and reliable due to the tracking process through which all messages are sent.
You will use "channels" to send messages to FINTRAC. A channel is a secure connection through which you send messages to and receive messages from FINTRAC. FINTRAC manages profiles, users and channels.
1.2. Message security
The batch transmission software ensures that your data is secure throughout the message sending process by using data encryption. This ensures that no unintended outside party can view the data within your message. The only party who will be able to view the data is the party for whom the message was intended.
1.3. Compatibility
A windows environment and a modern web browser.
2. Installation of the batch transmission software
2.1. Initial installation
As explained at the beginning of this guide, before you can download the batch transmission software, you have to have applied for a PKI certificate and related user access. FINTRAC will notify you by email once your PKI subscriber application has been approved. We will also send you a personal identification number (PIN) that you will need to go through the PKI user creation process and to download the batch transmission software.
Once you have your PIN, FINTRAC will contact you to provide a PKI certificate number. You will need it with your PIN to complete the following steps to download the batch transmission software.
Please ensure to whitelist the following within your proxy and Internet browser
https://www120.fintrac-canafe.gc.ca
https://www121.fintrac-canafe.gc.ca
Port 443 must also be open
The PKI user creation process described below only needs to be done once, for the initial installation of the batch transmission software. For any subsequent installations, whether to reinstall it on the same machine or to install it on other machines, you will need to go through the process described in section 2.2.
Go to the "PKI User Creation" screen
https://www120.fintrac-canafe.gc.ca/UserRegistration/cr-eng.html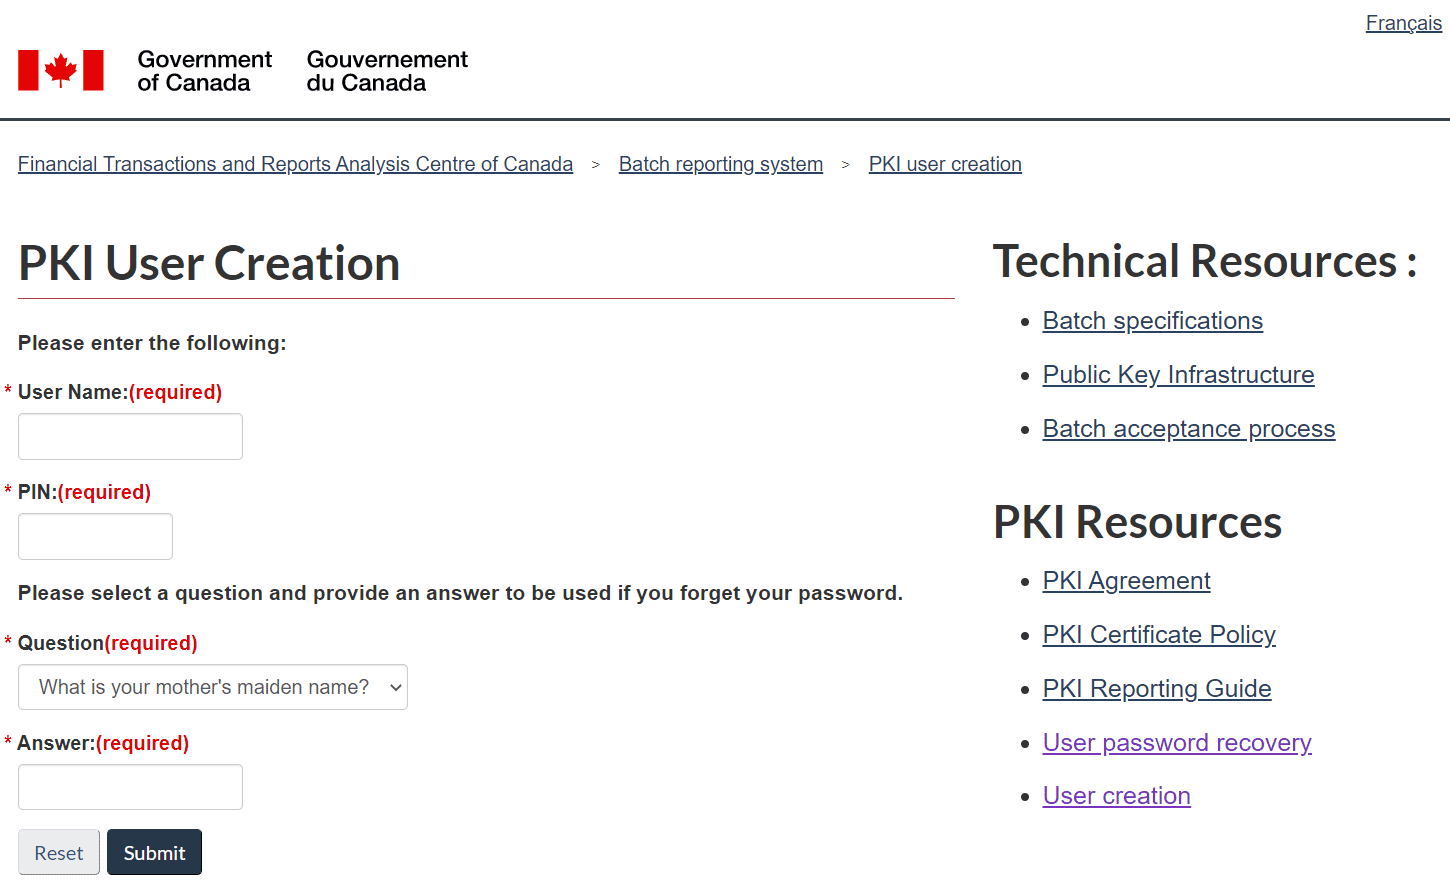
Figure 1 – User Creation page
Enter your PKI certificate number and your PIN (both are provided by FINTRAC).
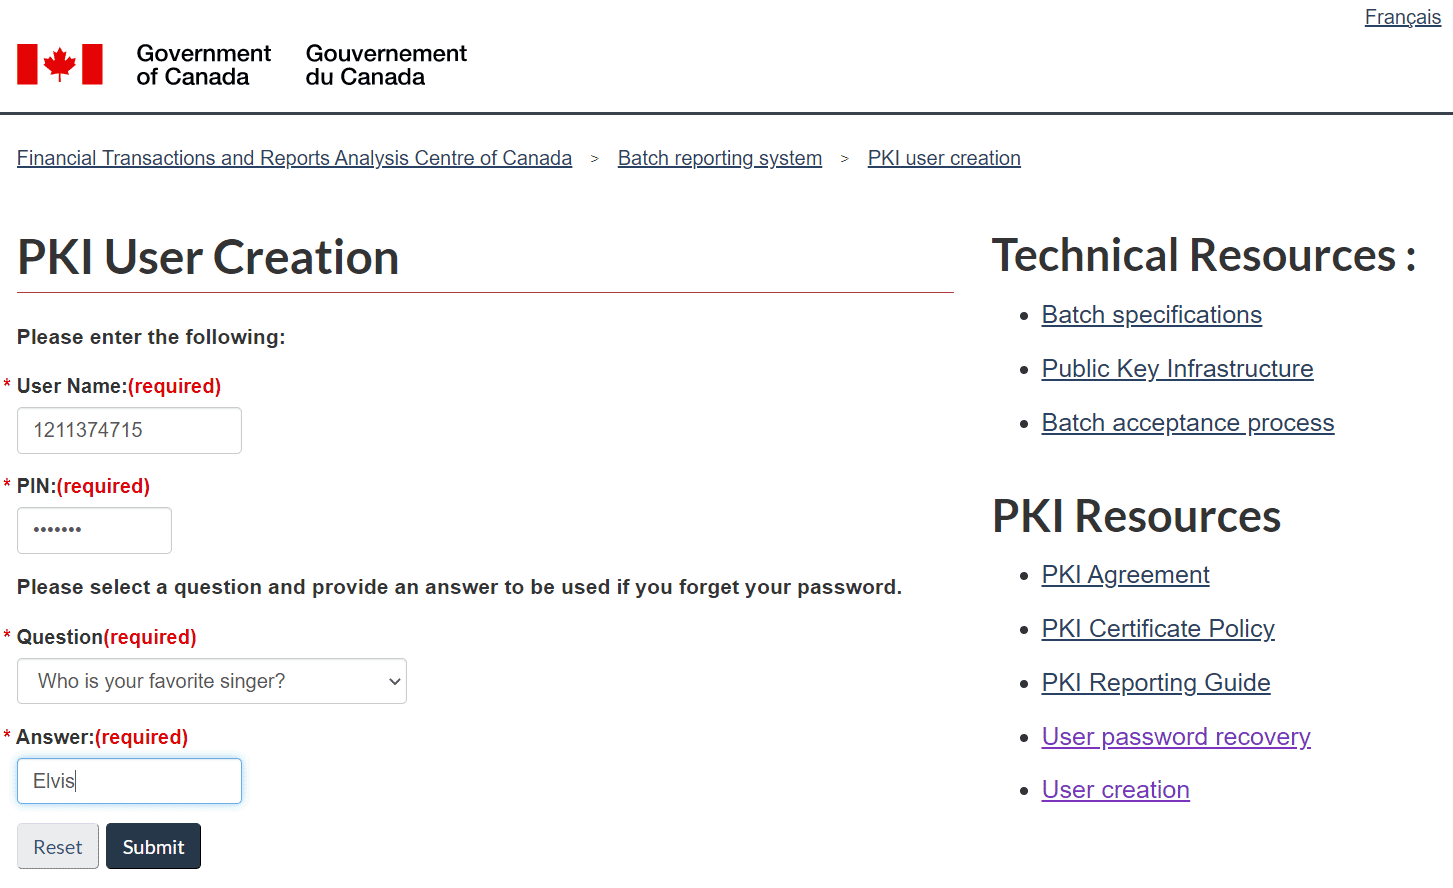
Figure 2 – PKI User Creation filled out
- Fill in your UserName, this is your PKI number. Fill in your PIN. This would have been provided to you by FINTRAC.
- Select the question you want to use for security purposes, and provide an answer. You will need to use this question and answer if you need to re-install the software after this initial installation.
- In each of the "New Password" fields, enter the password that you will use to login to the batch transmission software once it is installed. Other users from your organization that will be using this PKI key will need to use this same password.
- Select "Submit" to complete the PKI user creation. The batch transmission software installation process will then begin. Simply follow the onscreen instructions.
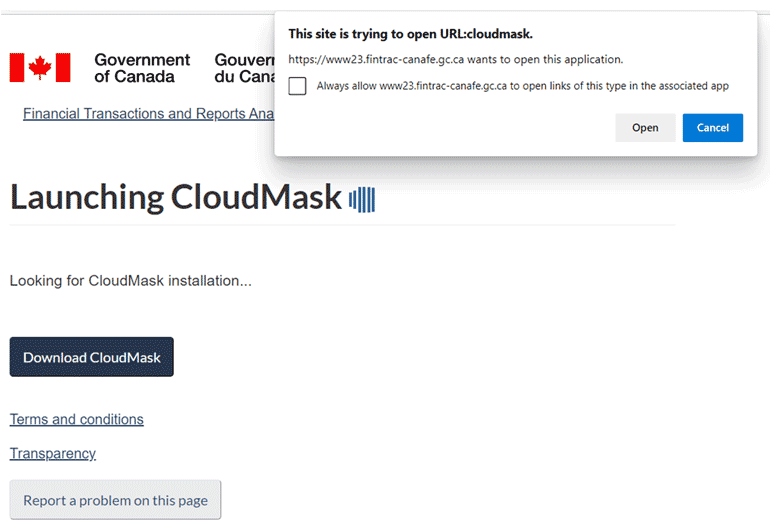
Figure 3 – Downloading CloudMask
- Once the software has finished installing, it will ask you to Activate it.
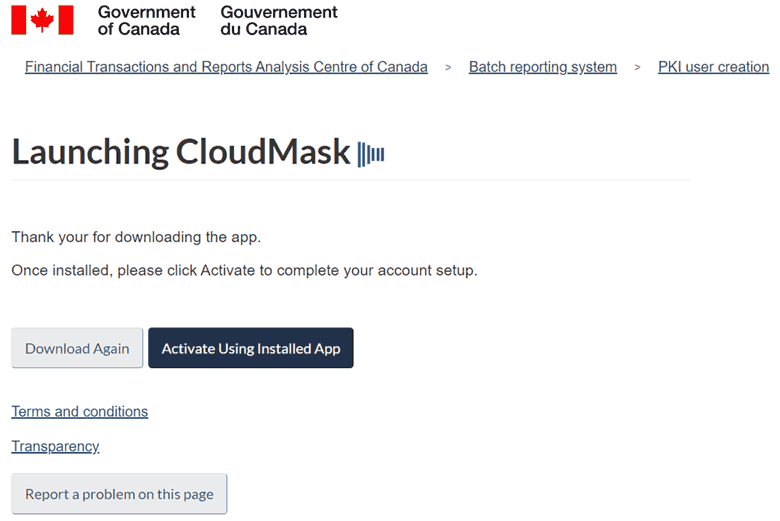
Figure 4 – Launching CloudMask
Activate the software by clicking on "Activate Using Installed App" button.
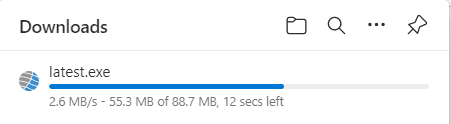
Figure 5 - Downloading
The batch transmission software will self-install at <WindowsDrive>:\Users\XXX\AppData\Roaming\CloudMask-agent, with WindowsDrive being the drive where Windows OS is installed.
Your PKI certificate will be placed under the above-mentioned folder as <WindowsDrive>:\Users\XXX\AppData\Roaming\CloudMask-agent\Profile\121137****.epf, with 121137**** being thePKI certificate number FINTRAC has assigned to you.
Once this initial installation is complete, you will need to confirm or change your new batch transmission software configuration. Please refer to section 4 for more information.
2.2. Subsequent installations
Follow these instructions if you have already successfully completed the initial installation process explained above and you need to do one of the following:
- Reinstall the batch transmission software on the original machine; or
- Install the batch transmission software on another machine.
With password and security question and answer
If you remember your password as well as the question and answer used in the PKI user creation process, complete the following steps:
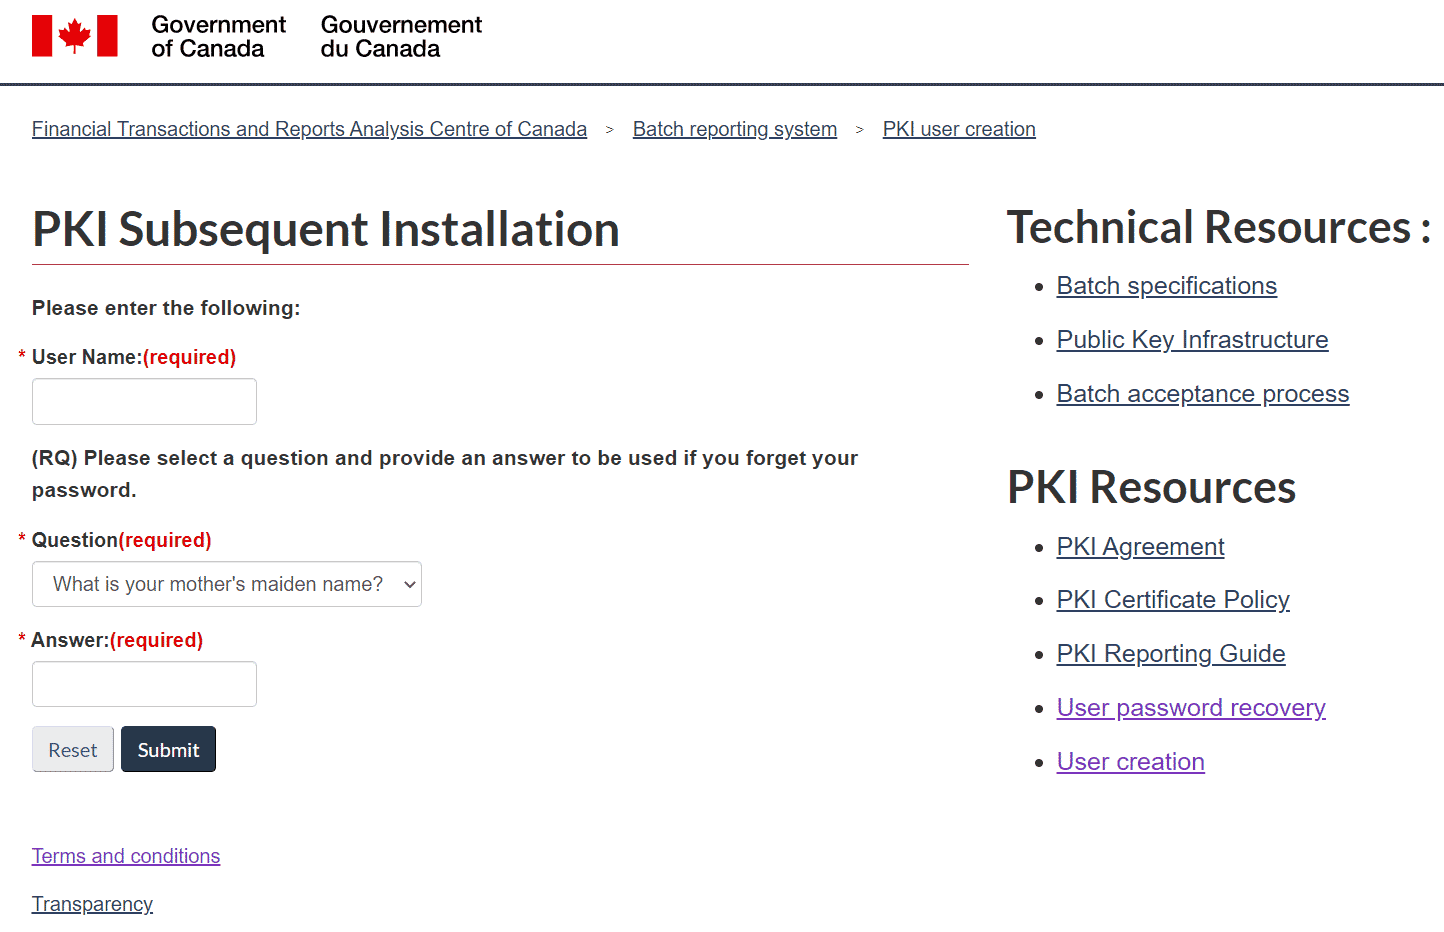
Figure 6 – Subsequent install CloudMask
- Go to the "PKI User: Subsequent Installation" screen at
https://www120.fintrac-canafe.gc.ca/UserRegistration/rq-eng.html Enter your PKI certificate number, select the appropriate security question and enter the answer.
Select "Submit" and the batch transmission installation process will begin.
-

Figure 7 – Download CloudMask
Select "Download Cloudmask", select "Open" and you will be prompted for a new password. You can keep the same password if you are installing the software on another machine, or change the password.
Without password or security question and answer
If you do not remember your password or the question and answer used in the PKI user creation process, complete the following steps:
- Contact FINTRAC, as explained in section 7, to get a personal identification number (PIN).
- Go to the "PKI User Recovery" screen at
https://www120.fintrac-canafe.gc.ca/UserRegistration/rec-eng.html - Enter your PKI certificate number and the PIN provided to you by FINTRAC.
- Select which question you want to use for security purposes, and provide an answer. You will need to use this question and answer if you need to re-install the software after this installation.
- In the "New Password" field, enter the password that you will use to login to the batch transmission software. Other users from your organization that are using this PKI key will need to use this password.
- Select "Submit" and the installation process will begin.
3. Operation
3.1. How to log on to or log off of the batch transmission software
You can access the batch transmission software log on screen by double-clicking on the CloudMask icon.
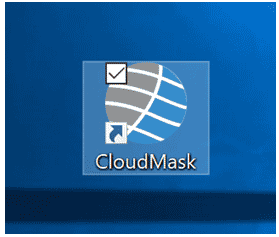
Figure 8 – CloudMask Icon
Your PKI certificate should be auto-filled. Enter your password and select "Login" to access the batch transmission software's main window.
When there are multiple PKI certificates on one machine, each one will require a different window login.
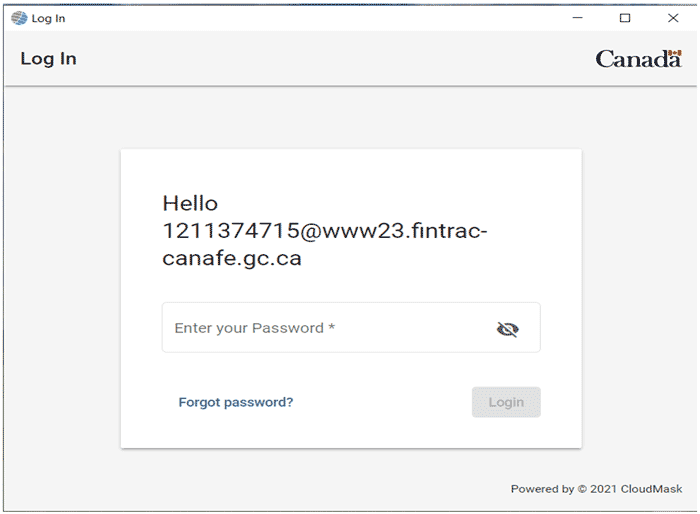
Figure 9 – Login
If you have forgotten your password, or if you need to change it, follow the instructions in section 2.2. This will result in a new installation of the batch transmission software, but will also provide you with a new password.
To log off, select the "Exit" button from the CloudMask icon in the system tray.
3.2. Batch transmission software main window
This home screen gives you details on your PKI setup:
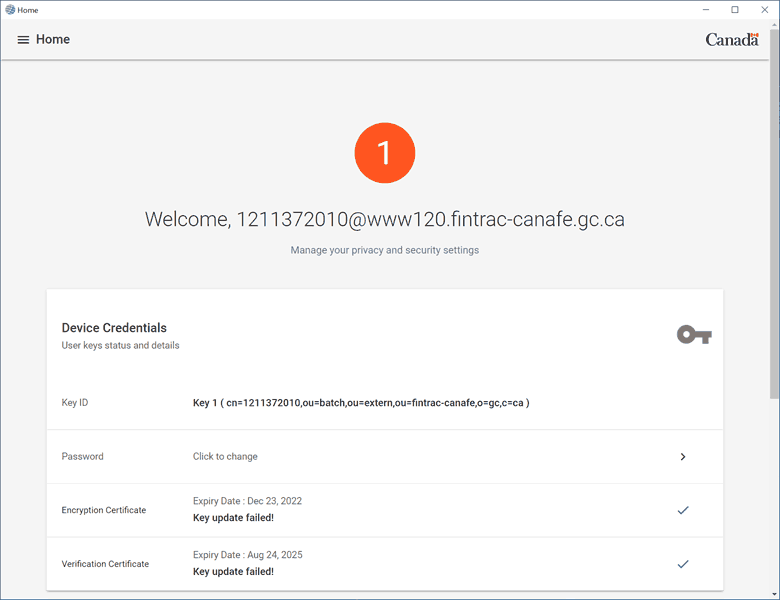
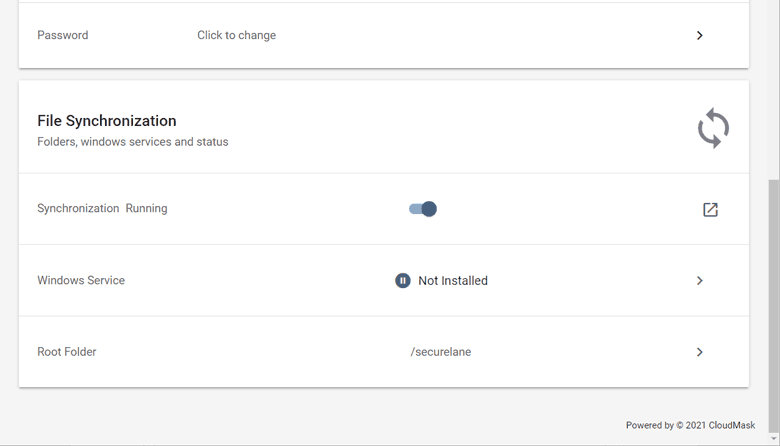
Figure 10 – Home screen
4. Configuration
The batch transmission software's Web interface provides you with a simple way to configure your system. Your configuration will be saved as part of a secure repository at FINTRAC.
4.1. Channels
The batch transmission software will present all the channels available to you. These channels are grouped and listed on the left side of the main screen. To get to this window from the main login window, click on "File Synchronization".
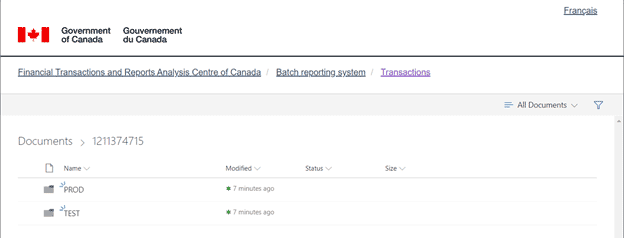
Figure 11 - Channels
You will automatically have access to the training channels. In order to submit production files, you will need to go through the acceptance procedures (certification) for each report type that you want to submit by batch.
Acceptance procedures
Your test reports for the acceptance procedures should be sent through the training channel, according to the type of report. As soon as you have sent in the required number of batch files with test reports, contact FINTRAC as explained in Section 7. Once you have successfully completed the acceptance procedures, you will be given access to submit real reports in the appropriate production channel.
For more information about acceptance procedures, see FINTRAC's specification documents available from the Batch documentation section of the area of the Batch reporting page.
Folders
The batch transmission software provides a single Data Root parameter representing the parent directory under which channel folders will be created, following the FINTRAC naming convention.
You can change the location of all the channel folders in a single step, by changing the Data Root parameter through the Web interface as follows:
- Select "Home" from the top menu.
- Select "File Synchronization".
- Modify the Root Folder parameter as required.
- Select "Apply".
Figure 12 - Root folder
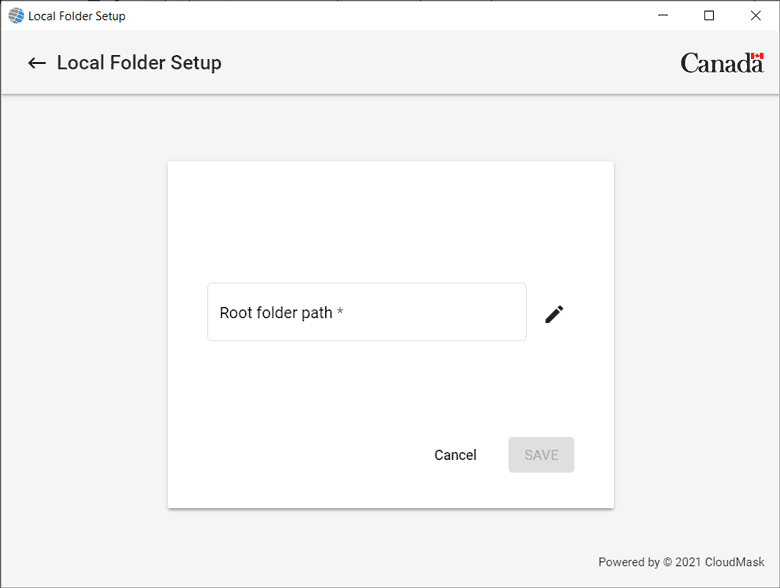
Figure 13 – Folder setup
You will not be able to change the naming convention under Root.
The default folder structure will be created automatically when files are sent through the channels, as follows:
| Channel Type | Purpose | Path |
|---|---|---|
ALT LCTR |
Production |
C:\SecureLane\121137****\PROD\ALT LCTR\ |
CDR |
Production |
C:\SecureLane\121137****\PROD\CDR\ |
CDR |
Training |
C:\SecureLane\121137****\TEST\CDR\ |
NEFTS |
Production |
C:\SecureLane\121137****\PROD\NEFTS\ |
NEFTS |
Training |
C:\SecureLane\121137****\TEST\NEFTS\ |
EFTS |
Production |
C:\SecureLane\121137****\PROD\EFTS\ |
EFTS |
Training |
C:\SecureLane\121137****\TEST\EFTS\ |
LCTRASCII |
Production |
C:\SecureLane\121137****\PROD\LCTRASCII\ |
LCTRASCII |
Training |
C:\SecureLane\121137****\TEST\LCTRASCII\ |
OrgXML |
Production |
C:\SecureLane\121137****\PROD\OrgXML\ |
STRASCII |
Production |
C:\SecureLane\121137****\PROD\STRASCII\ |
STRASCII |
Training |
C:\SecureLane\121137****\TEST\STRASCII\ |
4.2. Proxy
You can configure the batch transmission software to operate through a proxy server. To do this, configure the environment variable.
- Go to System Properties
- Click on Advanced Tab
- Click on Environment Variables
- Click on NEW
Type for Variable Name
CM_PROXY_URLType for Variable Value
http://XXXXXXXXXXXXX:8080 (If the port is different than 8080, please type the appropriate port) - Go to CMD prompt
- Type SET
- Scroll up to see if is the Environment Variable is now showing
CM_PROXY_URL=http://XXXXXXXXXXX:8080
4.3. Service mode
You can configure the batch transmission software through its Web interface to run as a Windows Service. If you operate in Service mode, there is no need to log on to transmit files. You will simply drop the files for transmission in the appropriate folders. There is also no need to log off, as the service continues running until you stop it.
To install the batch transmission software Windows Service, proceed as follows:
- From the main menu, select "Windows Service".
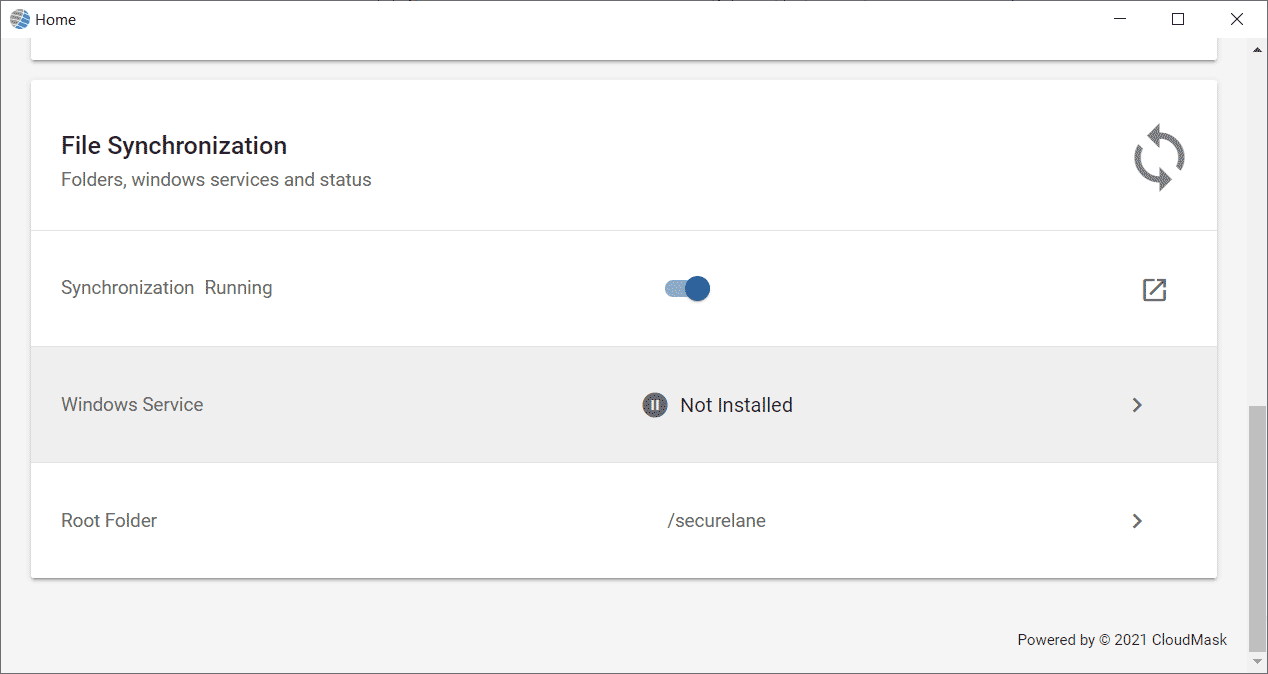
Figure 14 – Windows Service
- Select the right arrow.
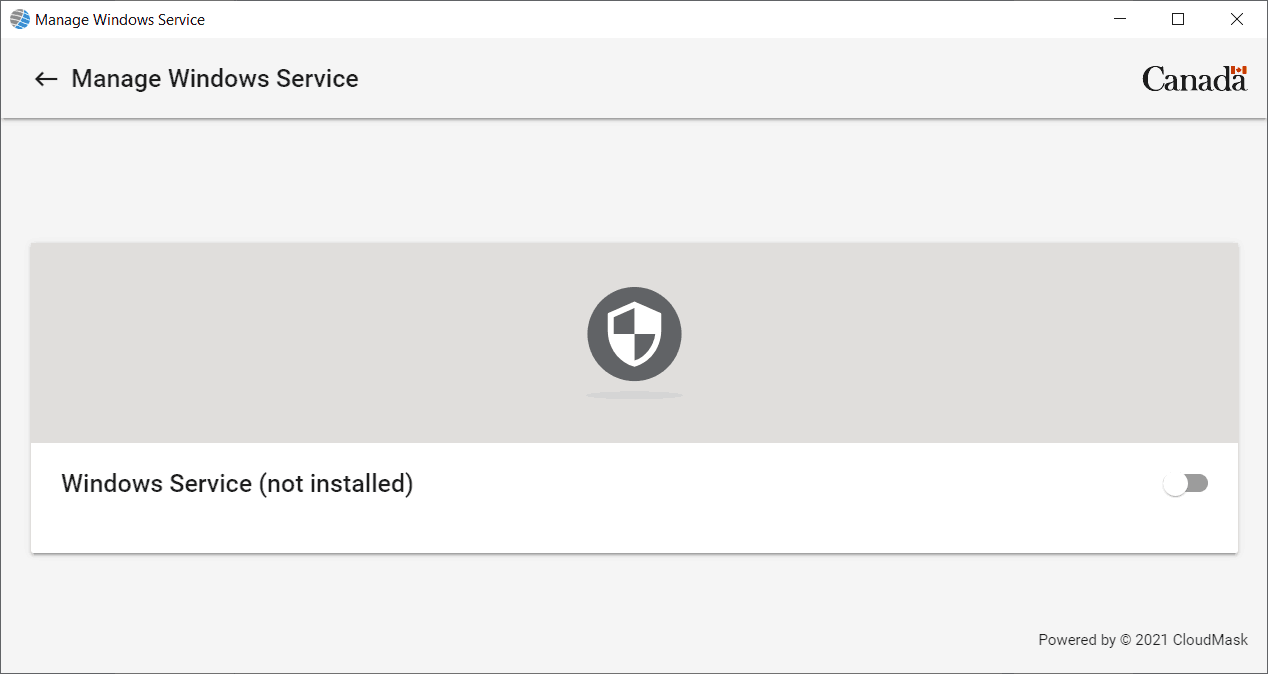
Figure 15 – Windows Service
- Slide the indicator to the right to turn on the service.
- Enter the password for the PKI key.

Figure 16 – Windows Service password
Once the PKI password is entered, you will be prompted for an Administrator username/password in order to install the Windows Service for CloudMask. When it is installed, you will be required to browse to Windows Service and start the CloudMask File Batch service. The web browser client will show the Service as running.
If you use the batch transmission software in Service mode, you can still log on to view specific information. However, you would not be able to transmit files while logged on.
For more information about Service mode, see section 5.1. If you do not operate in Service mode, you have to log on to send files. This is called User mode, see section 5.2 for more information about this mode.
If you need to uninstall the Windows Service, proceed as follows. You may need to do this if for example, you change the server running the service.
- Stop the service from Windows Service.
- Log on to the web browser.
- Go to "File Synchronization" and select the Windows Service.
- Slide the indicator to the left.
4.4. Viewing station
In some cases, you may wish to operate the batch transmission software in Service mode and connect to view your messages. This "viewing station" will not allow you to submit or receive messages.
To configure a viewing station, follow these steps:
- Install the batch transmission software on the computer you wish to use as a viewing station through the subsequent installation process described in section 2.2.
- Copy the existing EPF file (from the computer that is running the service) <WindowsDrive>:\Users\XXX\AppData\Roaming\CloudMask-agent\Profile\121137****.epf) to the computer that you just installed CloudMask on.
- Restart the batch transmission software service.
4.5. How to submit messages
To submit files to FINTRAC using batch transmission
- User Mode – Login to CloudMask, place the file in the appropriate drop folder.
- Service Mode – Place the file in the appropriate drop folder, ensure the service is running.
When you send an outbound file, you will receive an inbound file from FINTRAC, which is an acknowledgement file concerning processing results. For more information about acknowledgement files, see FINTRAC's specification documents available from the Batch documentation section of the Batch reporting page.
4.6. Message status
The following explains what the message status means.
| Message status | Description |
|---|---|
Pending |
The file is waiting to be sent or received. |
Encoding |
The file is being signed, compressed and encrypted. |
Encoded |
The file has been signed, compressed and encrypted. |
Transferring |
The file has been encoded and is being transferred. |
Transferred |
The file has been received and is ready to be decoded. |
Decoding |
The file is being decrypted, decompressed and verified. |
Decoded |
The file has been decrypted, decompressed and verified. |
Acknowledged |
The file has been received, its signature is valid, and the file has been processed. |
Refused |
The file has not been accepted because of the signature, sender, encryption, file size, or file extension was invalid. See the "Details" section in the GUI for more information. |
Aborted |
The file has been rejected and tried for the maximum number of times without success. |
5. Understanding sending and receiving of files
Each channel has, at a minimum, the following folders defined:
| Name | Description |
|---|---|
Out\ |
Polled for outbound messages. |
Out\Done |
Appears on both inbound and outbound messages. It contains messages that have been completed. |
Out\Failed |
Appears on both inbound and outbound messages. It contains messages that have failed. |
5.1. Sending and receiving in Service mode
If you are operating in Service mode, the batch transmission software is polling the out\drop folder for new outbound messages. The service is also polling the transport server for new inbound messages.
When the batch transmission software detects a new outbound message, it will move it to the done folder. The batch transmission software then waits for a receipt from the receiving party. When the receipt arrives, it processes the message and moves the file to the "Done" folder. If at any point the message fails, the batch transmission software will move the file to the "Rejected" folder.
When the batch transmission software detects a new inbound message, after the download is complete, the data is validated and a receipt is sent to the party who sent the message. If at any point the message fails, the system will move the file to the "Rejected" folder.
5.2. Sending and receiving when not operating in Service mode
If you are not operating in Service mode, login to CloudMask. As long as the software is running, simply drop the files in the appropriate channel drop folder. The batch transmission software is polling the out\drop folder for new outbound messages. It is also polling the transport server for new inbound messages.
As long as CloudMask is running, when the batch transmission software detects a new outbound message, it will move it to the "Done" folder. The batch transmission software then waits for a receipt from the receiving party. When the receipt arrives, it processes the message and moves the file to the "Done" folder. If at any point the message fails, the batch transmission software will move the file to the "Rejected" folder.
As long as CloudMask is running, when the batch transmission software detects a new inbound message, after the download is complete, the data is validated and a receipt is sent to the party who sent the message. If at any point the message fails, the systems will move the file to the "Rejected" folder.
6. Message tracking
The batch transmission software provides a message tracking Web interface. Key features are listed below.
6.1. Search filters
Filters are provided directly above the Message View Area in the main window. The search filter fields allow you to filter for the following information:
| Filter Field | Description |
|---|---|
Name |
Filter by file name |
Modified |
Filter by (Newer to Older, Older to Newer, Date) |
Status |
Filter by message status: All (any status), Accepted, Failed (refused or aborted) or In progress (includes any status from pending to decoded) |
Size |
Filter by size of file |
7. How to contact FINTRAC
If you have questions or comments about the batch transmission software, you can contact FINTRAC for technical help as follows:
- Email: tech@fintrac-canafe.gc.ca
8. Glossary
- Channel
- A channel is a connection between a batch transmitter and FINTRAC used to send and receive messages.
- Message
- A message is data sent through a channel to or from FINTRAC.
- Receipt
- A receipt sent from a message's receiving party to the sending party denoting whether the message has been successfully received (positive receipt) or has failed for some reason (negative receipt).
- Service mode
- Service mode is the mode in which the batch transmission software is configured to run automatically on a user's system, as a service on Windows network.
- Date Modified: